

- Anderson’s Bridge Definition: Anderson’s Bridge is used to measure low-quality factor circuits by comparing known resistance and capacitance values.
- Double Balance: It achieves double balance by fixing the capacitance and varying resistance.
- High Accuracy: Known for its precision in measuring inductors ranging from micro Henry to several Henry.
- Experimental Method: Set the signal frequency, adjust resistances, and use the derived formulas to find the unknown inductance.
- Advantages and Disadvantages: Easier to balance for low-quality factors but involves complex equations and shielding difficulties.
Anderson’s Bridge
Anderson’s bridge is the low-Q inductance bridge. Maxwell bridge covers medium Q. Hay’s bridge covers high Q. Maxwell and Hay both struggle to null a low-Q coil.
Use Hay for high Q and Maxwell for medium Q. Anderson’s Bridge is a modified Maxwell’s inductance-capacitance bridge with an extra resistor-capacitor path for low Q.
Anderson’s Bridge is a modified Maxwell inductor capacitance bridge. Balance uses a fixed capacitance and you trim electrical resistance instead of a variable standard capacitor.
Textbooks quote a working span from a few microhenry up to several henry for inductors on this bridge. The unknown L is compared with known R and C. The circuit diagram of Anderson’s Bridge is below.
The unknown inductor sits between a and b. r1 is the series resistance of that coil.
Arms bc, cd and da are resistors r3, r4 and r2. A standard capacitor sits in series with variable resistor r, and that series pair is connected in parallel with cd.
The source is connected between b and e.
Balance then gives l1 and r1:
At null the following relations hold:
Equating voltage drops then gives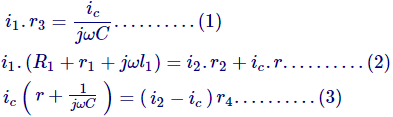
Substitute ic in those equations to get

Equation (7) is heavier than the Maxwell pair. Alternate trims of r1 and r in Anderson’s bridge converge faster than moving both at once.
The classic lab null uses headphones. Set the signal generator in the audio band. Trim r1 and r until the phones are quietest.
Read those r1 and r settings with a multimeter. Put them in the formula above to get the unknown inductance. Repeat with another standard capacitor if you want a check.
Phasor Diagram of Anderson’s Bridge
Mark the voltage drops across ab, bc and cd, plus ad, as e1, e2, e3 and e4 as shown in the figure above.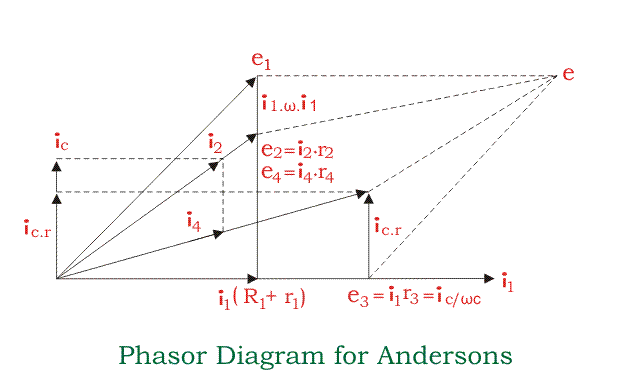
In the phasor diagram of Anderson’s bridge, i1 is the reference. ic is drawn at 90° to i1 because of the capacitor at ec. i4 and i2 lead the reference by the angles shown.
The source voltage e is the phasor sum of e1, e2 and e3 plus e4. As shown in the phasor diagram of Anderson’s bridge the drop i1 (R1 + r1) plus i1.ω.l1 (drawn at 90° to i1) is e1. e2 is i2.r2 at angle ‘A’ to the reference.
e4 is the drop i4.r4 at angle ‘B’ to the reference.
Advantages of Anderson’s Bridge
- A low-Q coil is easier to null on Anderson’s bridge than on a Maxwell inductance-capacitance bridge.
- The standard capacitor can be a fixed value. You do not need a variable standard C.
- The same network can also give capacitance from a known inductance.
Disadvantages of Anderson’s Bridge
- The inductor equations are heavier than Maxwell’s pair.
- The extra capacitor node makes the network harder to shield.
If a variable standard capacitor is allowed, Maxwell is still the simpler choice over Anderson’s bridge.


