

- Weston Frequency Meter Definition: The Weston frequency meter measures frequency by using the deflection of a magnetic needle caused by perpendicular currents in two coils.
- Construction: It includes two coils, three inductors, and two resistors arranged in a specific configuration.
- Working Principle: The meter works by detecting changes in the magnetic field strength, which moves the needle towards the stronger magnetic field.
- Circuit Diagram: The diagram shows Coil 1 with a series resistor (R1) and reactance coil (L1), and Coil 2 with a series reactance coil (L2) and parallel resistor (R2).
- Behavior with Frequency Changes: The needle moves left with higher frequencies and right with lower frequencies, reflecting the change in the current through the coils.
The Weston type frequency meter works on the principle that when current flows through two perpendicular coils, magnetic fields are produced, causing a magnetic needle to deflect towards the stronger magnetic field, indicating the frequency. Its construction is similar to the ferrodynamic type of frequency meter. The circuit diagram requires two coils, three inductors, and two resistors.
Given below is the circuit diagram for the weston type frequency meter.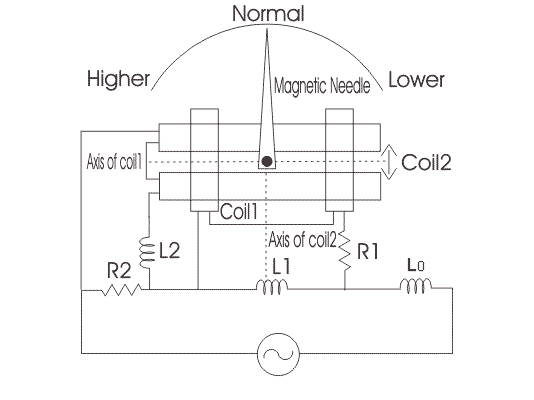
Axis of both coils are marked as shown. Scale of the meter is calibrated such that at standard frequency the pointer will take position at 45o. Coil 1 contains a series resistor marked R1 and reactance coil marked as L1, while the coil 2 has a series reactance coil marked as L2 and parallel resistor marked as R2. The indcuctor which is marked as L0 is connected in series with the supply voltage in order to reduce the higher harmonic means here this inductor is working as a filter circuit. Let us look at the working of this meter.
When we apply voltage at the standard frequency, the pointer stays at the normal position. If the frequency increases, the pointer moves to the left, indicating a higher frequency. If the frequency decreases, the pointer moves to the right, indicating a lower frequency. If the frequency drops below normal, the pointer crosses the normal position and moves further left.
Let’s examine the internal working of this meter. The voltage drop across an inductor is proportional to the frequency of the source voltage. As the frequency of the applied voltage increases, the voltage drop across inductor L1 increases, which raises the current across Coil 1. This causes the current through Coil 1 to increase and the current through Coil 2 to decrease.
As the current through Coil 1 increases, its magnetic field also increases, causing the magnetic needle to move more to the left, indicating higher frequency. If the frequency decreases, a similar action occurs, but the pointer moves to the right.
")
")
")
")